Install RustDesk via Action1

By | December 3, 2025

I use Action1 to manage endpoints across many locations. The one thing Action1 is not excellent at and does not plan to be is a great remote access tool. Self-hosting RustDesk fits in perfectly for this need. I created a powershell script that can be run via Action1 to quickly install the RustDesk client onto all my endpoints silently along with adding a custom value to Action1 to let me know the RustDesk ID of each endpoint. This post is not about how to create your own self-hosted version of RustDesk, merely, show an example of how to deploy it via Action1 (Or similar tool) easily via a powershell automation.

The script below is sequential is very easy to follow. Modify it as you need.

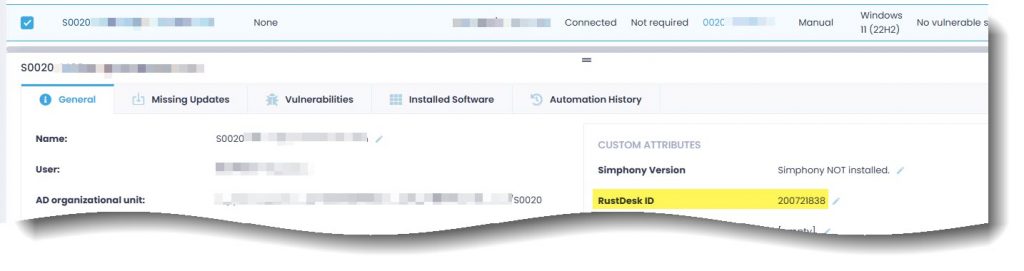
Action1 Portal showing RustDesk ID fed via install script.

<#
.NOTES
    Author: C. Weis
    Versions:
    251203 Initial

.SYNOPSIS
    Install RustDesk client.

.DESCRIPTION
    Install RustDesk client with custom self hosted settings.
    Example created to show deployment via Action1.

.EXAMPLE
    [PS] C:\>.\RustDesk-Installer.ps1

#>


<# --------------------------------------------------------------------------------
	RustDesk configuration file.

    This is the contents of a file that will be created to replace configuration
    file that RustDesk installer creates. This file will contain info for self
    hosted server and key file.
----------------------------------------------------------------------------------- #>
$rd_config = @"
rendezvous_server = 'rs-ny.rustdesk.com:21116'
nat_type = 1
serial = 0
unlock_pin = ''
trusted_devices = ''

[options]
custom-rendezvous-server = 'PATH OR IP OF YOUR SELF HOSTED SERVER HERE'
direct-server = 'Y'
av1-test = 'N'
allow-remote-config-modification = 'Y'
key = 'YOUR CUSTOM KEY FILE CODE HERE'
relay-server = 'PATH OR IP OF YOUR SELF HOSTED SERVER HERE'
"@


<# --------------------------------------------------------------------------------
	Download Rustdesk MSI and drop into Temp directory.
----------------------------------------------------------------------------------- #>
$rd_src = 'https://github.com/rustdesk/rustdesk/releases/download/1.4.4/rustdesk-1.4.4-x86_64.msi'
$rd_dst = "$env:TEMP\rustdesk-1.4.4-x86_64.msi"

Invoke-RestMethod -Uri $rd_src -OutFile $rd_dst


<# --------------------------------------------------------------------------------
	Start Installation.
----------------------------------------------------------------------------------- #>
Write-Host "Calling Installer: $rd_dst" 
Start-Process 'msiexec' -ArgumentList "/i ""$rd_dst"" /qn INSTALLFOLDER=""C:\Program Files\RustDesk"" CREATESTARTMENUSHORTCUTS=""Y"" CREATEDESKTOPSHORTCUTS=""N"" INSTALLPRINTER=""N"" /l*v RDinstall.log" -Wait

# This delay is needed for lower end devices to finish installation process successfully.
Write-Host "Install completed. Pausing 30 Seconds." 
Start-Sleep -Seconds 30


<# --------------------------------------------------------------------------------
	Stop service and drop in new config file.
    This assumes script being run as localsys.
----------------------------------------------------------------------------------- #>
Stop-Service -Name RustDesk

$rd_configpath = 'C:\WINDOWS\ServiceProfiles\LocalService\AppData\Roaming\RustDesk\config'
$rd_config | Out-File -FilePath "$rd_configpath\RustDesk2.toml" -Encoding UTF8 -Force

Start-Service -Name RustDesk


<# --------------------------------------------------------------------------------
	Set Password

    Password is created based partially on machine name.
    Grab second through the fith characters of computername to create first 
    part of password. Then add additional string: ##Soda.
----------------------------------------------------------------------------------- #>
$rd_app = "C:\Program Files\RustDesk\RustDesk.exe"

$rd_pass = $Env:computername
$rd_pass = $rd_pass.Substring(1, 4) + "##Soda"

Start-Process $rd_app -ArgumentList "--password $rd_pass"

Write-Host "Password Set: $rd_pass"


<# --------------------------------------------------------------------------------
	Retrieve key ID number.

    Send to Text file in program directory and push to Action1 custom attribute.
----------------------------------------------------------------------------------- #>
$rd_id = & $rd_app --get-id | Out-String
$rd_id = $rd_id.Trim()

$rd_id | Out-File -FilePath "C:\Program Files\RustDesk\RustDesk-ID.txt" -Encoding UTF8 -Force

# Have Action1 set the RustDesk ID to a custom attribute named, "RustDesk ID".
Action1-Set-CustomAttribute 'RustDesk ID' $rd_id

Linux Firefox touchscreen support

By | November 23, 2025

I updated my laptop to Ubuntu 25.10 which no longer has Xorg. Since I am not a fan of Wayland due to issues with some applications I use have with Wayland, I decided to install the Mate desktop environment which has Xorg support. I then noticed that Firefox does not work well with touchscreens (No pinch and zoom and scrolling) unless you make a couple of adjustments. Below is what worked for me to resolve this issue.

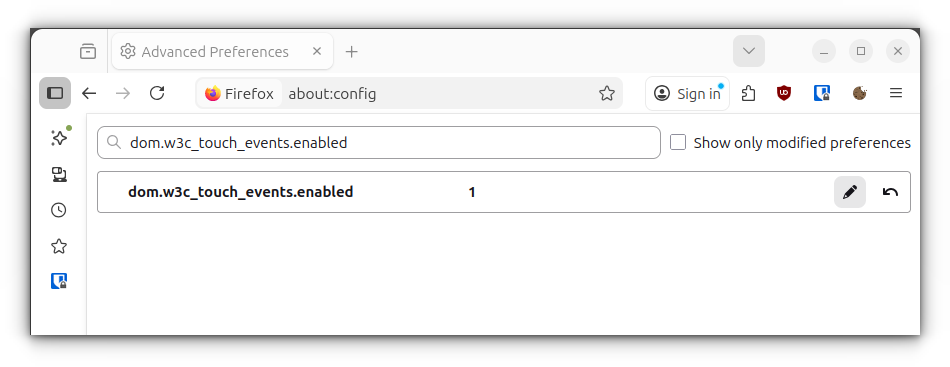
Open Firefox and go to about:config. Search for dom.w3c_touch_events.enabled. Set the value to 1.

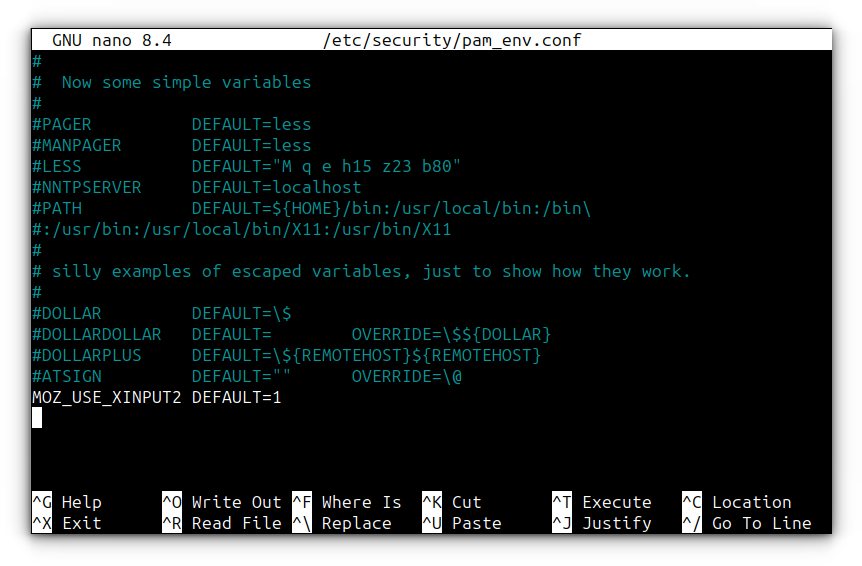
Now open the file /etc/security/pam_env.conf and add this line to the bottom of the file:
MOZ_USE_XINPUT2 DEFAULT=1
Save the file. Then reboot your computer. Touchscreen support such as pinch and zoom should now work just fine.

Easily create a bootable external drive

By | October 23, 2025

I like having a bootable partition on my external drives and larger USB flash drives. This makes a great emergency rescue, cloning device or a bootable private PC environment without disrupting the actual computer and without taking up much space on the external drive.

The 2 bootable images I like to use on external devices are:

There is a cost involved with Parted Magic, but MiniOS is a newer free contender and really unique with a restorable session ability. Here I am going to explain how I easily make any USB or external drive bootable but still contain a large area for loose data.

Create a FAT32 partition on the external device that can contain the ISO of the bootable image you want to extract. On a 1tb external drive, I carve out 8gb, then the remaining is NTFS.

Open the ISO image you downloaded with an archive utility. Extract the contents onto the FAT32 partition. Below, I am using the XArchiver tool that is included with the XFCE desktop.

That’s it! Now you have a bootable external drive if you need it, or it can still be used as a regular loose data storage device.

1 TB External drive booted the laptop to MinOS Ultra. Still have 997 gigs of free space.

Never ever install Nextcloud from Yast

By | August 29, 2025

Years ago, when I spun up my OpenSuse VM to run my website and Nextcloud, I used the Nextcloud installer from the software repository included with OpenSuse. I realized after a few years now that decision was a huge mistake! Don’t ever do this!

The Nextcloud version still listed today in the OpenSuse repo is version 24.0.8. My version of Nextcloud running was 30 (Nextcloud has been getting upgraded directly as new releases are available). The issue I ran into this week was OpenSuse 15.5 is EOL, I decided to upgrade to OpenSuse 15.6. I ran the OS upgrade and the upgrade downgraded my Nextcloud install back to 24.0.8 and killed it. I received the terrible message from the Nextcloud site when I tried to launch it:

Downgrading Nextcloud from version 30.0.8.1 to 24.0.8.2 is not supported and is likely to cause unpredictable issues.

It took me two days to figure out a workaround which is probably a solid fix. I removed the Nextcloud installed application information from the RPM database. By doing this, zypper no longer detects Nextcloud as an installed product and therefore will not attempt to update the application during the upgrade. This is accomplished by running the following 2 commands (Thank goodness I snapshot my VM’s before ever making upgrades and was able to roll it back quickly a few times until I found a solution):

  • sudo rpm -e –justdb nextcloud-apache
  • sudo rpm -e –justdb nextcloud

Now I was able to perform the distribution upgrade without damaging the Nextcloud installation because zypper no longer detects Nextcloud as an installed application. Problem solved. I now have a current version of OpenSuse Leap and Nextcloud running again.

Note: I do know YAST is becoming deprecated, but the data is pulled from the RPM database, so the issue would still happen if I just used the repo’s version.